Happy Tuesday, everyone!
Is anyone out there feeling crafty?
After I put up pictures of the little felt bees I made back in April for The Snail of Happiness’s Craftivism event at The Make It Shop in Manchester, there was a quiet murmuring of interest in response to my offer to share the pattern. So, when I found myself with a clear calendar and the need to do a little bit of computery drawing practice, it seemed like the perfect opportunity to publish the templates and put together a quick tutorial! If any of you take the plunge and give the pattern a try, please let me know how you got on… or share your photos on Instagram with the hashtag #crawcraftsmakes! Ready? Let’s go!
You will need:

- Felt in black, yellow and cream (make sure it’s quite thick, or your bee will have sad floppy wings!)
- Sewing thread in black, yellow and cream
- Sew-on googly eyes
- Pink or red embroidery cotton
- Toy filling
- Sewing kit – Pins, needles, scissors, pinking shears, fabric marker
And here are the templates you’ll need:
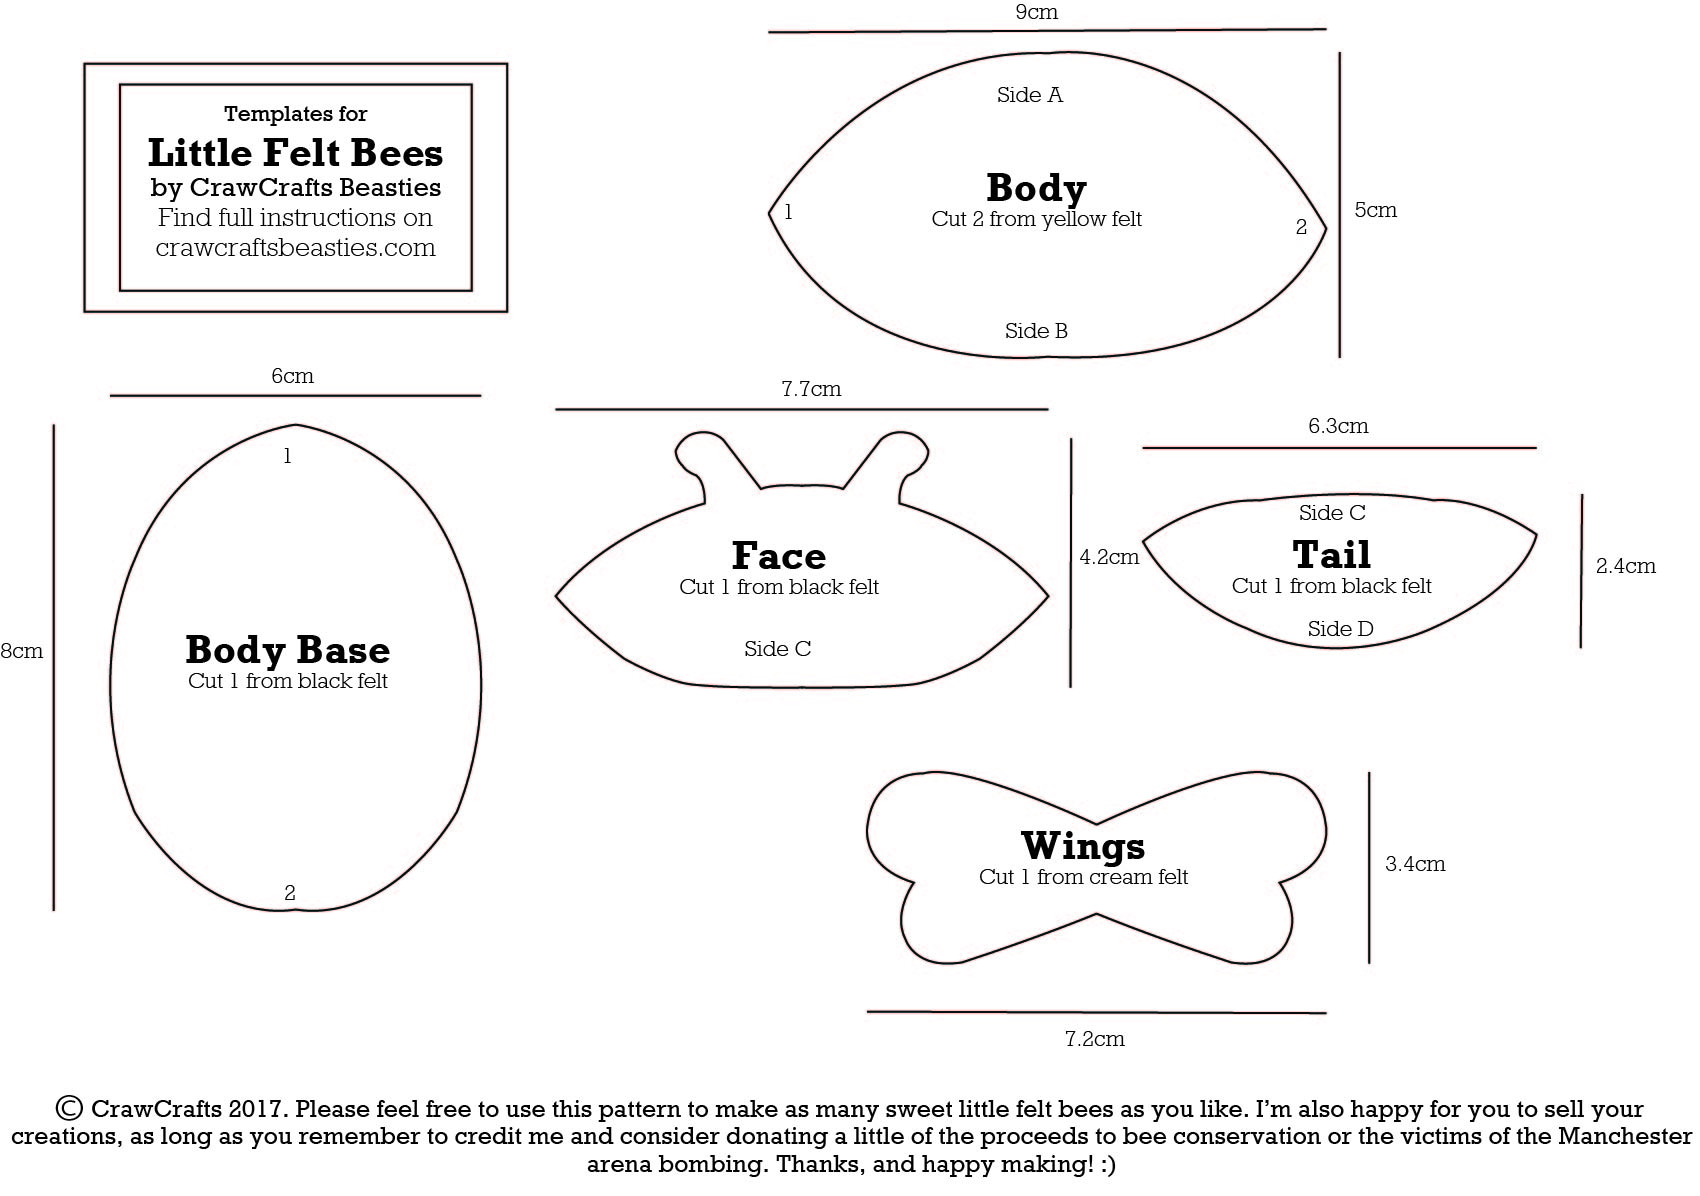
- Start by printing out your templates. The pattern is designed to print onto a single sheet of A4 paper, and please make sure the “fit image to page” box in your print options is unticked before you print! I’ve included the dimensions of my original templates so you can check if yours have come out the right size. (Update! Early testers have told me that the best way to get an accurate printout is to download the image, then open it in a drawing program like MS Paint. So, click the template image, then right click and save it to your computer. Open Paint, find the file, open it and send it to print… And don’t forget to set your page orientation to “landscape” before you click OK!)
- Mark out the pieces on your coloured felt sheets, as per the instructions on each template. Don’t forget to flip over the yellow body template before cutting out the second piece, to make sure that it’s a mirror image of the first! The fiddly bits (like the antennae) are best cut out roughly with big scissors first, then you can pin the template to the felt and trim a little closer with smaller scisssors like I’m doing in the first photo.
 You’ll also need to cut out a strip, 9.5cm x 1.5cm, for the bee’s stripe. So, you’ll end up with 2 yellow body pieces, 1 black body base, 1 cream wing shape and black pieces for the face, tail and stripe.

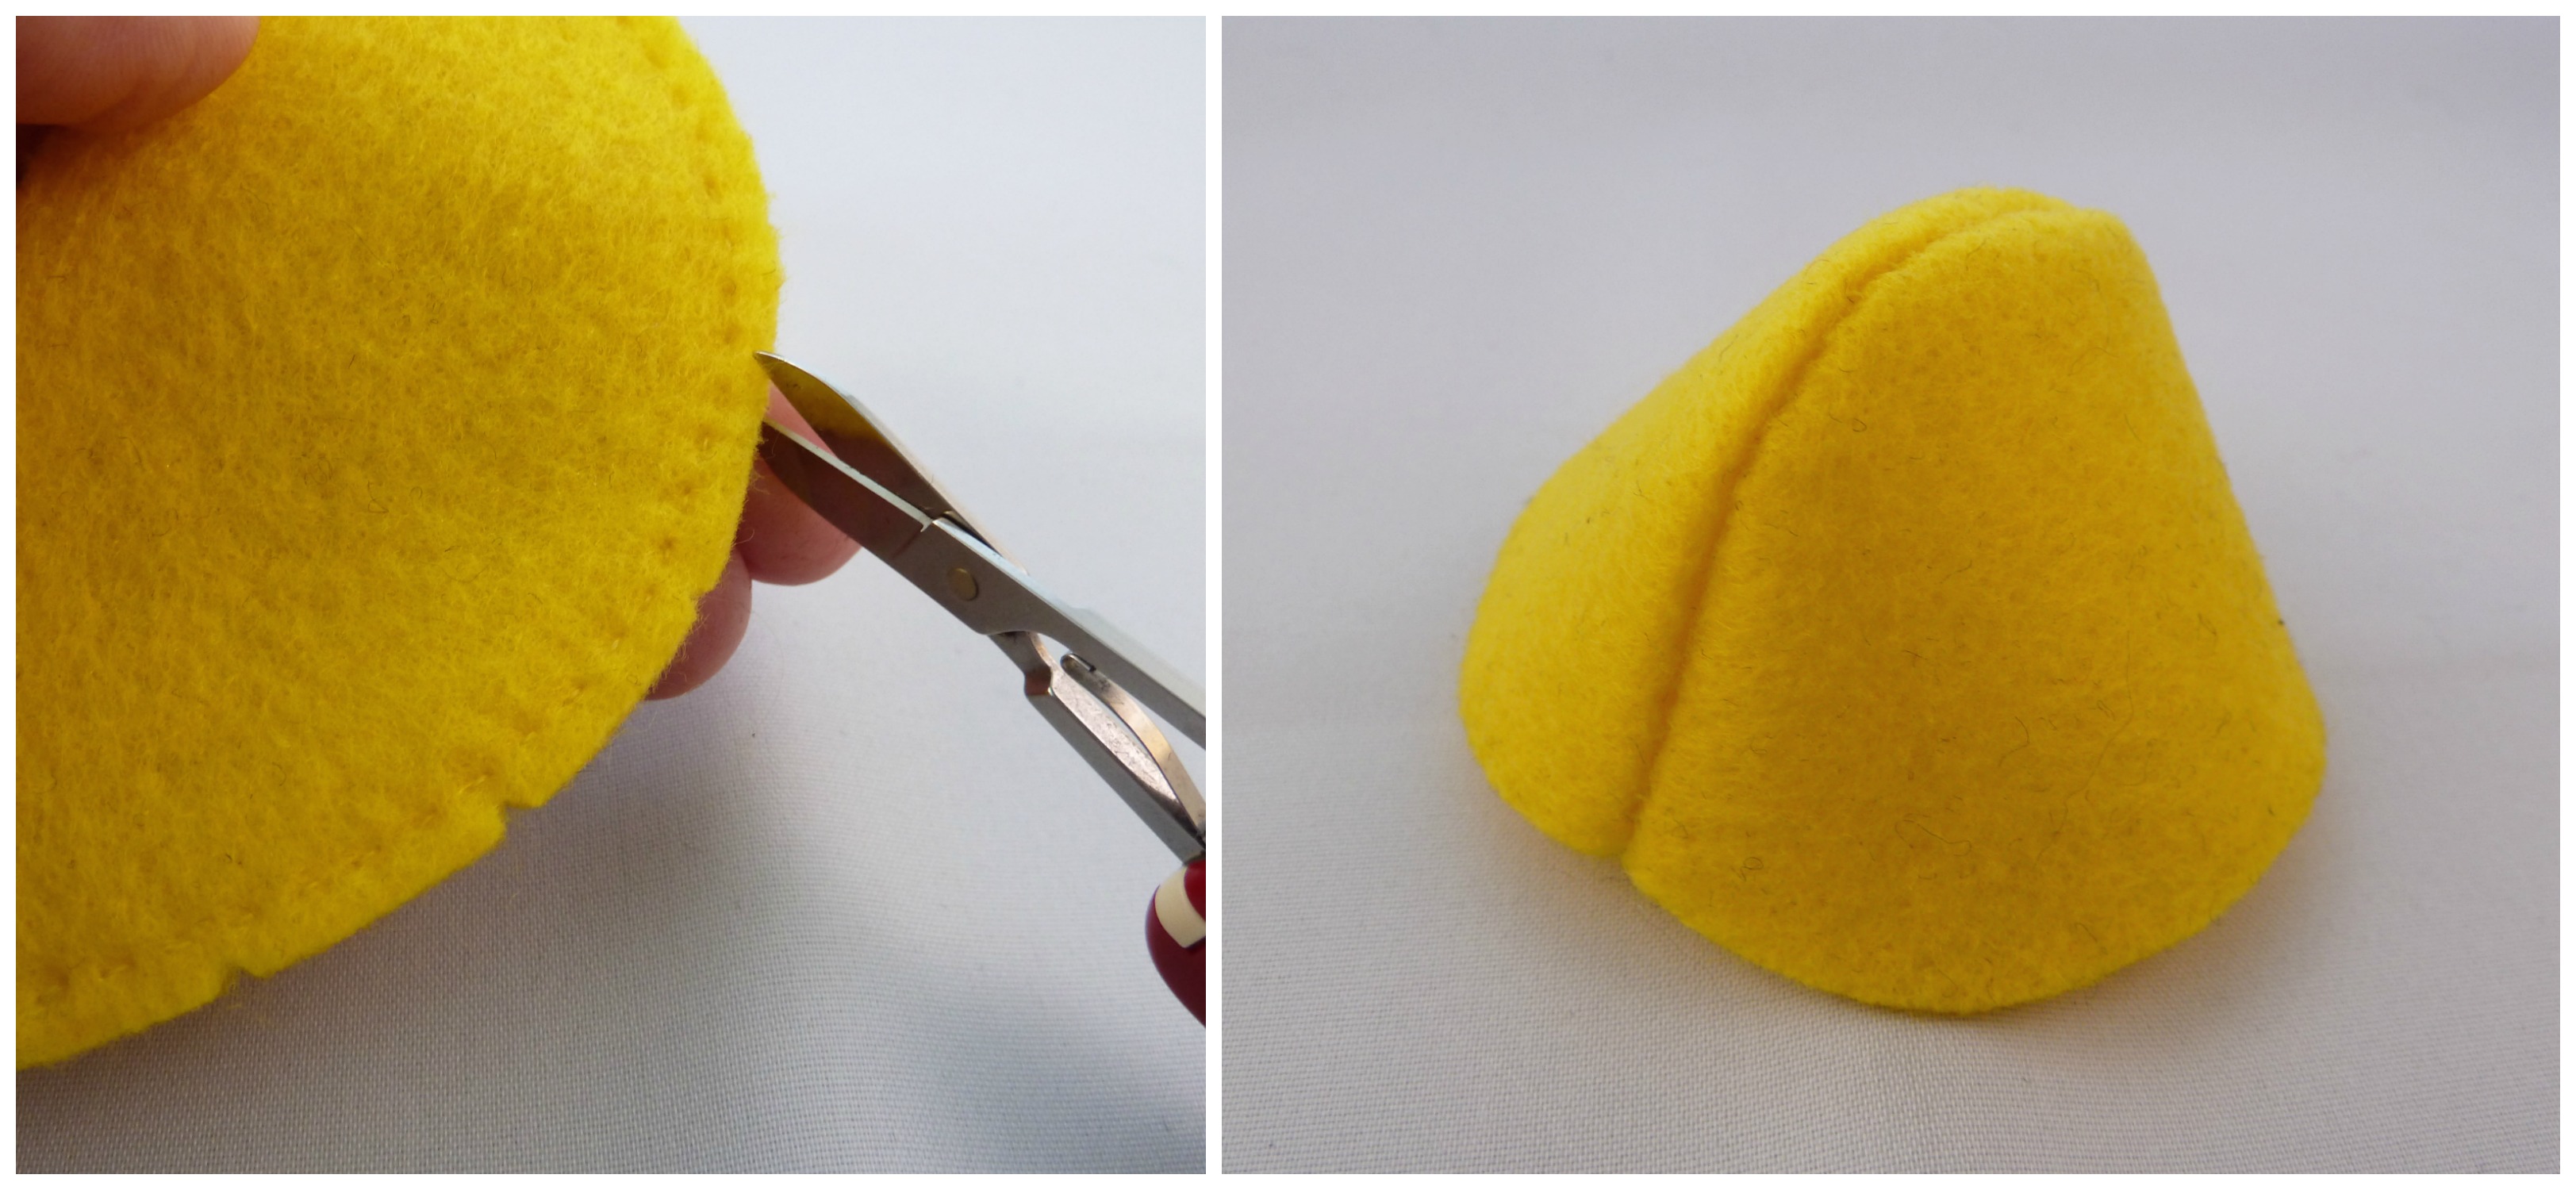
OK, let’s start putting these together! Pin your two yellow body pieces together, and sew from point 1 to point 2 along side A, as marked on the template. Keep your seam around 3mm from the edge of the fabric.
 4. For a smoother curve, cut a few notches at intervals along the edge of the felt, near to (but of course not actually touching) the seam. Then turn the body “shell” right side out.
 5. Pin the yellow body pieces to the black body base. Secure the nose and tail first by pinning point 1 of the yellow shell to point 1 on the black base, and point 2 to point 2. Then pin each side. Next, sew almost all the way around the edges with a simple in-and-out running stitch in black thread.
 6. Don’t stitch all the way around, though! When you’re within 2cm of the beginning of the seam, take a break from sewing and get stuffing. Gently push the toy filling inside, making sure it gets right up into the top of the bee’s back! I find a chopstick or pencil really helps with this bit.
 Then continue sewing to close up the opening.
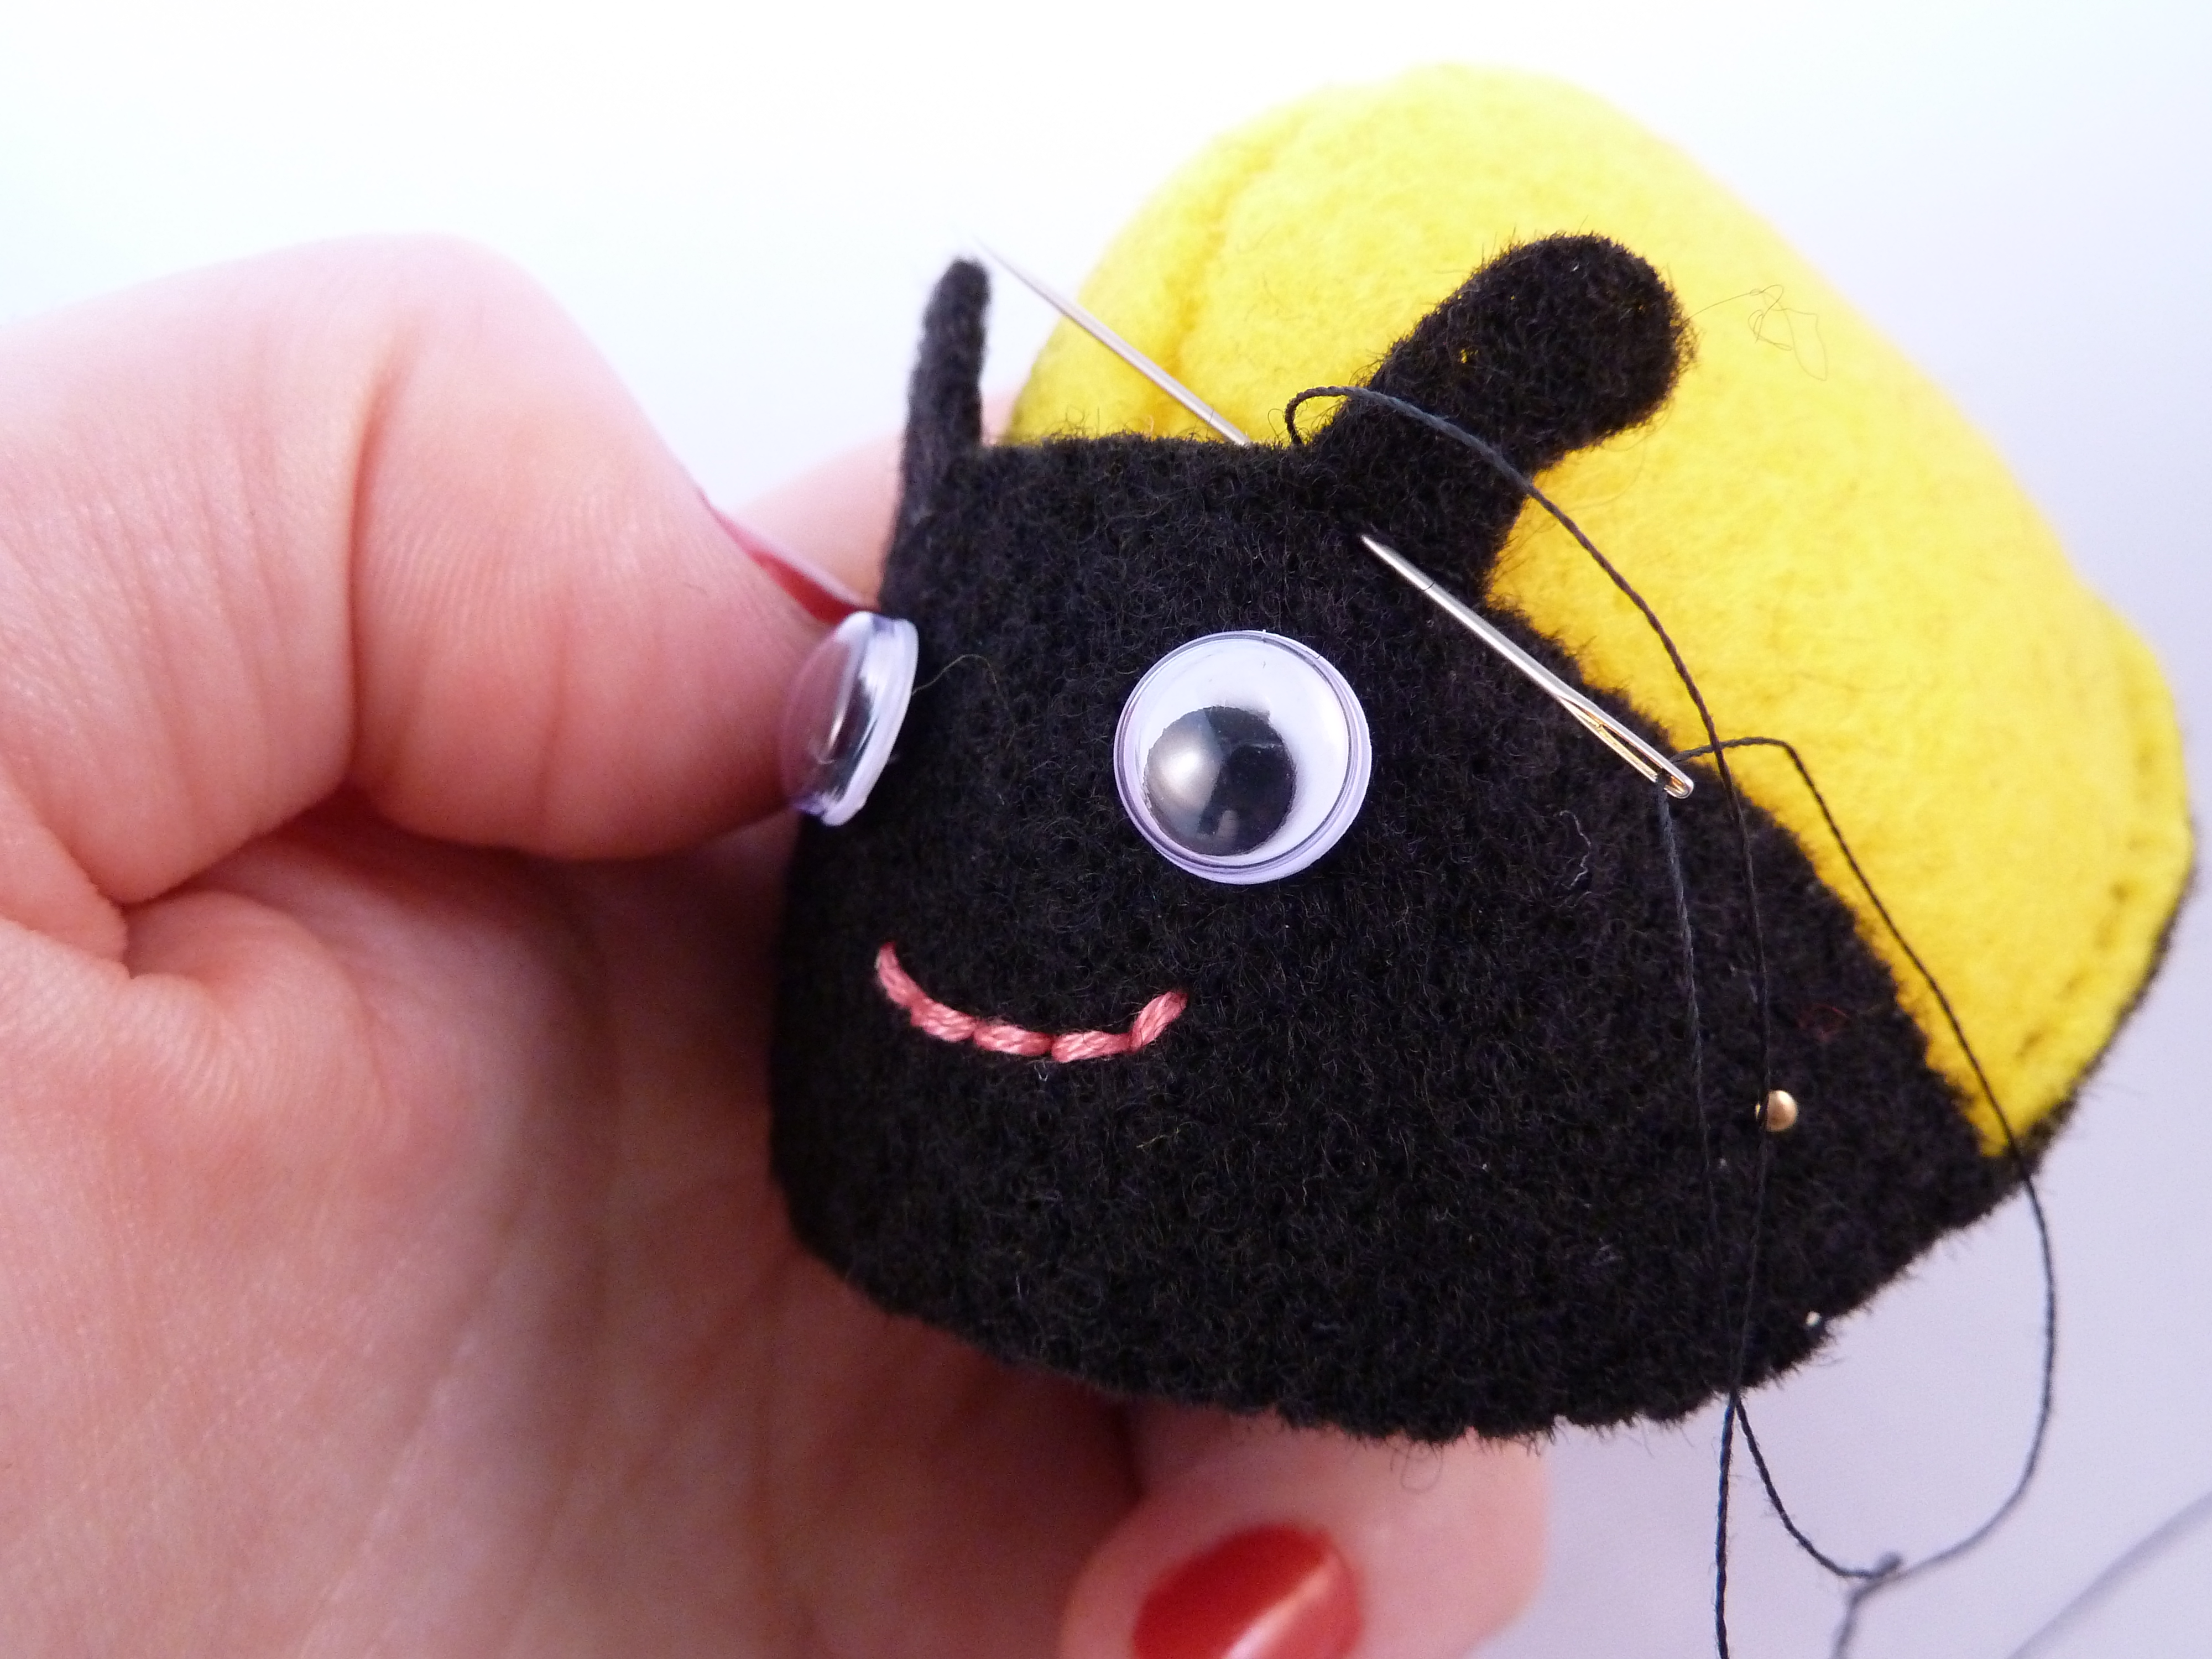
7. Now for the features! Sew on googly eyes (or stick them with glue) and use backstitch to embroider a simple smile underneath using 3 strands of embroidery floss.
 8. Pin the face to the front (point 1) of the body, then use whip stitch to sew along the bottom edge (side C) first, and then along the top. I’ve done a couple of stitches in orange for the photos, so you can see what’s going on!
 When you get to the antennae, sew a couple of backstitches across the base, so that they can stand up from the bee’s head.
 9. To make your bee look nice and fuzzy, trim the long edges of the stripe and side D of the tail piece with pinking shears.
 10. Next, attach the tail piece to the bee’s bottom (point 2) in the same way as you attached the face piece. Side C covers the line of black stitches at the base, while the zigzag edge goes over the bee’s back. Pin in place, then stitch as before…
 11. …And then repeat for the stripe as well!
 Nearly there!
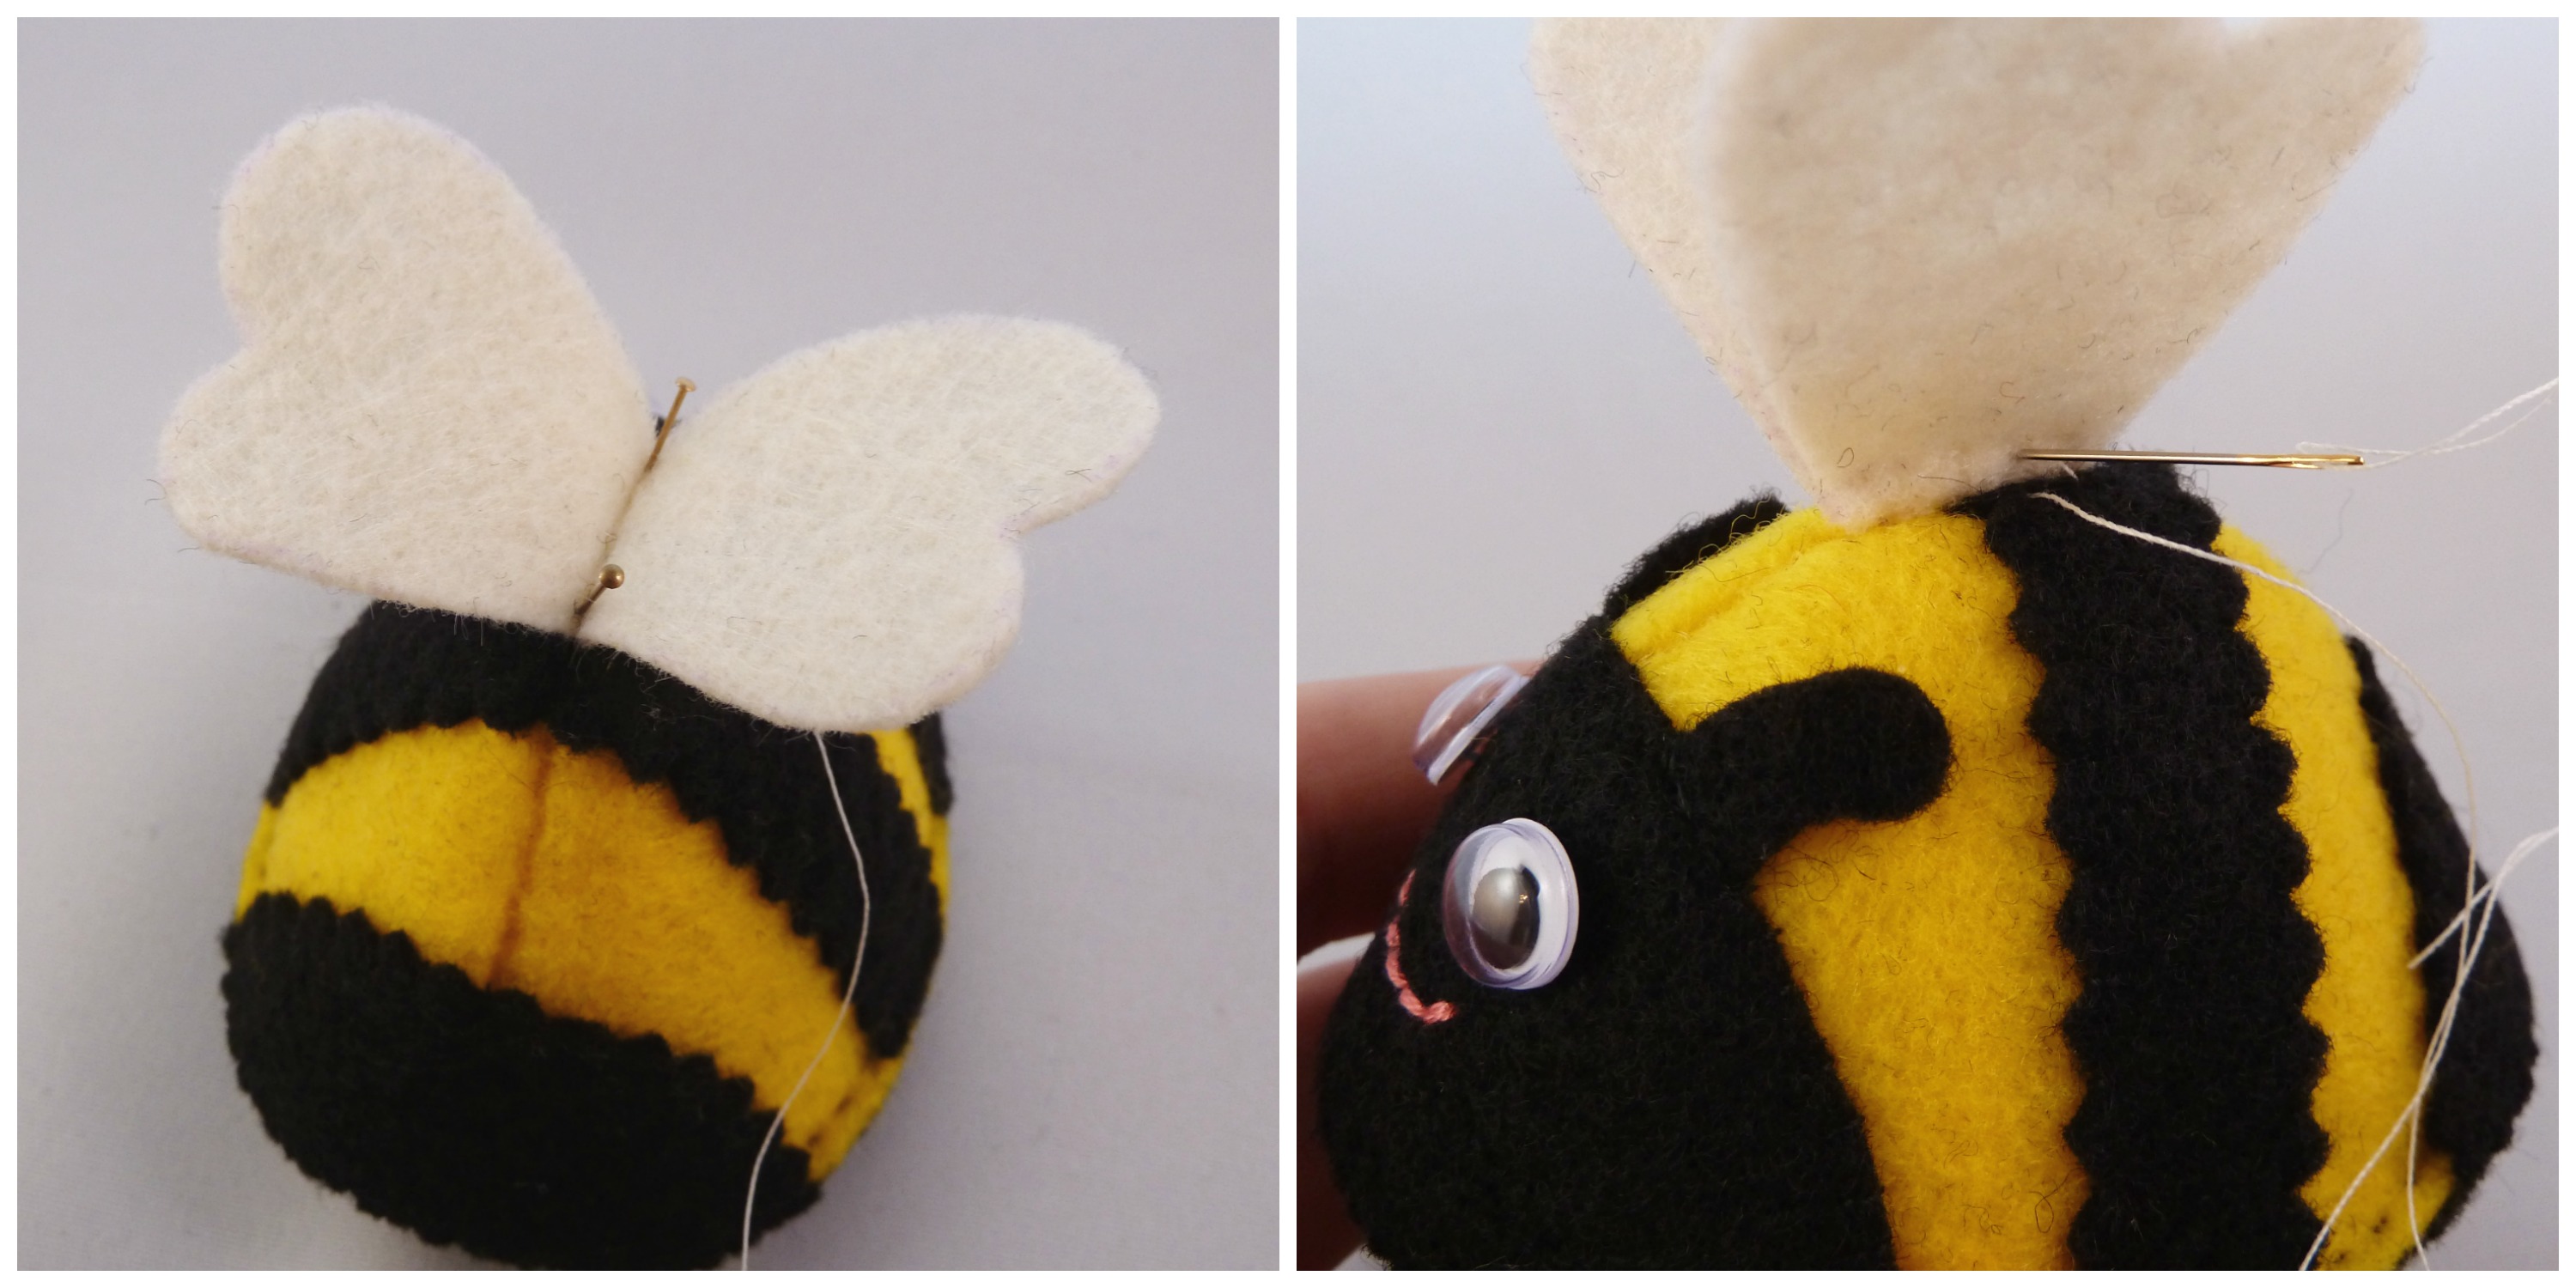
 12. For the wings, fold the wing shape in half and sew a seam 2mm from the short edge in cream thread.
 13. Then attach the wings by placing the folded edge in the centre of the bee’s back, and sewing a quick line of stitches through the fabric between the seam and the fold.
 Finito! Ready to take off for all sorts of new adventures…

 These bees make fun little gifts (for you or someone else), or why not use them for a little craftivism of your own? I reckon the pattern could also be simplified for kids (or the short of time) by gluing the features in place, rather than sewing them! Or why not mix up the colour combinations to match the bees who live in your garden?
We’ll be back next week (hopefully not so late in the day!) with some more new Beasties for you to meet! See you then… and happy making!
oooh lovely… will have a go very soon.
Yippeeeeee! Thank you… Let me know how you get on with printing the templates if you do give it a try. It’s my first go drafting a pattern on the computer and I’m curious about how user-friendly it is!
Right, I’ve just managed to print out the pattern – I was unable to do it direct from my web browser (Internet Explorer on a PC) as it wanted to print in negative and really big by spreading the pattern over loads of sheets (monster bees – eek!); then when I’d manually adjusted the size to fit on an A4 sheet, landscape, the printer kept coming up with an error. So, I saved the jpg onto my hard drive (open picture, right mouse click, select ‘save picture as’), then opened it using Paint, set the paper orientation to landscape and it has worked and is the right size. I now need coffee before embarking on actually making a bee.
Go go Dr Snail! Thanks for the feedback on the pattern-printing process… Perhaps it might be helpful if I update my post to include your instructions? I think Paint (or a similar program) is the way to go… One of my test prints from the Windows 10 Photos app mysteriously shrank the templates, that’s what prompted me to put the measurements on them! Enjoy your coffee, and good luck with your beemaking!
Bee made – instructions fine. I’ll send a picture at some point 🙂
Thank you for this. I am going to bookmark this for the benefit of my 10 year old. He has not yet used templates or a pattern so that will be a new learning experience for him with his felt creating.
Brilliant! Thank you… And if you need any extra pointers, just give me a shout 😀
Fantastic
Thanks! Let me know if you give the pattern a try! 🐝
Sweet. 🙂 Great directions. You make it look so easy.
Great photos and brilliantly clear instructions! I’m going yo have a go at this. If it works out well (I’m talking about problems with my sewing here, not your design!) I might even stitch it to one of my hats.
Why stop at one? I think a crown decorated with a swarm of them would be much more appropriate!
PS Try printing the templates using the free MS Paint program on your computer, rather than Photos. That should get the scale right!
Oh, Helen, this feltie-bee pattern is absolutely brilliant! What a great and user-friendly tutorial that makes all the steps and parts very clear. You’re a great craft-teacher! It’s magical how everything comes together! Luckily, I have different versions of all the materials (including the mini Swiss army knife with built in scissors, which I love, and our bag o’ googly eyes. So glad I get to use them). Thank you for this! I can’t wait to set aside some bee-making time. 🙂
Oh wow, thanks Shirley! And good luck with your bees… Do let me know if you get a chance to make one, I’d love to see how they turn out 😀 I know we talked about this before, but aren’t Swiss Army knife scissors the best for trimming fine details? I’d be lost without mine!
Love the bee pattern ,very clear instructions thanks
Thank you! And do let me know if any little felt bees come to live in your lovely garden! 🐝
The master is sharing her knowledge with the masses! I would be making hundred so these if I didn’t hate the feel of felt (hmm…is that like the Firth of Forth?). Still, they’re terribly cute. Actually, now I’m wondering if I could make them with fabric and just back the wings with some stiff interfacing…ooh!!!
You totally could, you know! And if you attached the base to the body in the same way as the two yellow body bits are put together (running stitch and then turn inside out), you’d have no fraying edges to worry about! Plus, if you used a heavy fabric, you could even use your mad artist skills to paint on stripes and features. The possibilities are endless!
I’m buzzing with excitement to make some. Now if only I had some spare time….⏲🐝⏲🐝
Yep, that’s always the problem! I had good intentions of making my first prototype of these LAST SUMMER! 😆